A binary image file has no matching source code so the debugger can only use the Disassembly View.
To load a binary image, select 'Load Binary' from the File menu then pick a file type from the filter box and a file to load. If you choose a .hex (Intel Hex) file, the debugger will load it at the specified addresses in the file. For other file types you will be asked for a load address and they will be treated as pure binary (not an object file or file with debugging information).
It is up to you to ensure the file fits in the available memory. The debugger does a basic check that you are writing to RAM but it doesn't fully verify the download. On hardware this is sufficient to alert you if you are writing to ROM or using the wrong memory map.
Binary files can be included in .load files to load a number of blocks of code/data to different addresses without picking the file and load address each time.
Any file can be loaded as a block of binary data but it is unlikely to make sense to the disassembler unless it is valid Z80 code.
Source code consists of one or more .lst files with matching binary images. These files are produced by compilers or assemblers and the debugger reads the output files. Most Z80 source code is assembly language but it is better to work with the assembler source than the binary output as will become apparent. A number of different tool chains are supported, each of which have different requirements to make their output compatible with the debugger.
To load source code, select 'Load Source' from the File menu, pick a file type from the filter box and a file to load. The file to load depends on what tools you've used to build the code, see Source Code Formats.
When loading source code, the debugger automatically detects the source code format. It stitches together all the source files into one view, extracts the global variables and loads the binary code into the target memory. It also swaps the disassembly view for the source code view which contains all the user's labels and variable names instead of just their memory addresses shown in the disassembly view. The F12 key can be used to switch between source and disassembly views.
The same basic load to RAM check is done as when loading a binary image. To debug an image which is already loaded into a ROM or EEPROM device, load the source for that ROM image. The check will pass if the binary data matches the ROM image.
This version (V1.1) of the debugger supports the following source code formats...
Build all the C files with sdcc -mz80 --debug ... and any assembler files with sdasz80 ....
Link them together with sdcc ... and convert the .ihx file to a .bin file using sdobjcopy -I ihex ....
IMPORTANT: The debugger needs the --debug switch.
To load the project, click on the File->Load Source menu, select SDCC Link Files in the file filter list and navigate to the folder with the file, click on your .lk file and you should see your code.
When the debugger reads the .lk file, it expects to find the following files...
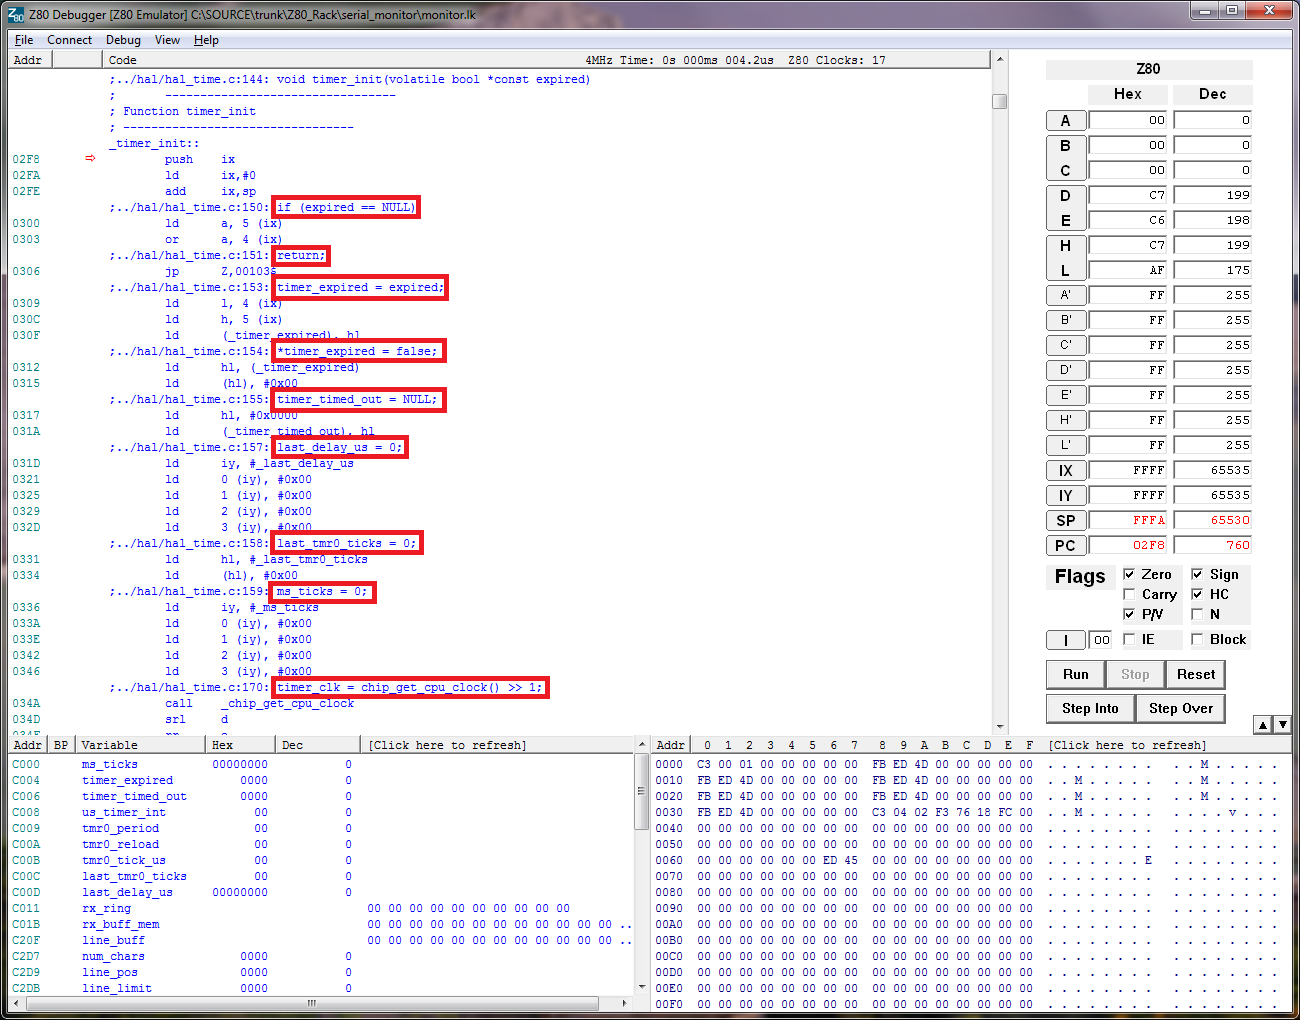
At the start of each file, the debugger inserts a comment with the file name so it is clear which .lst file that section of code comes from.
Each C function is shown with a comment such as timer_init() at the top of this view. SDCC generates this comment.
The lines of C code (red boxes) are shown as comments followed by the generated Z80 assembler for each line. C code stepping is possible simply by right clicking the first assembler line of each C statement.
Global variables are extracted from the .lst files and added to the Variable view. However the local variables are not parsable by this mechanism as they are found on the stack and which variables are valid depends on the execution context. It is possible to do this and a future version of the debugger may support it.
Assembling your source files produces a .lst and a .out file for each source file with the same names. These files aren't bound together in any way and may need loading at different addresses. So you need to write a .load file so the debugger knows where to put each file in memory and knows that they belong together as a set. The .lst files will be stitched together to form a single continuous source code view. The debugger adds a comment at the start of each .lst file to identify the file.
To load the project, click on 'Load Source' from the File menu, select 'LOAD Files' in the file filter list and navigate to the folder with the file, then click on your .load file and you should see your code.
Assembler directives that define variable space such as DEFB, DEFW, DEFS etc. will be parsed and added to the Variable View. Byte declarations longer than 4 bytes will be shown as arrays or strings.
Assemble your files to .lst and .bin files of the same name. By default UZ80AS produces binaries with the .obj extension - this is wrong as the files are not linkable or relocatable, they are simple binaries, so you'll need to specify .bin output file names in your build scripts. The end result is a bunch of .lst and .bin files which aren't bound together in any way and may need loading at different addresses. So you need to write a .load file so the debugger knows where to put each file in memory and knows that they belong together as a set. The .lst files will be stitched together to form a single continuous source code view. The debugger adds a comment at the start of each .lst file to identify the file.
To load the project, click on 'Load Source' from the File menu, select 'LOAD Files' in the file filter list and navigate to the folder with the file, then click on your .load file and you should see your code.
Assembler directives that define variable space such as .DB, .DW, .DS etc. will be parsed and added to the Variable View. Byte declarations longer than 4 bytes will be shown as arrays or strings.
Assembling your source files produces a .lst and a .hex file for each source file with the same names. These files aren't bound together in any way so you need to write a .load file so the debugger knows they belong together as a set. The .lst files will be stitched together to form a single continuous source code view. The debugger adds a comment at the start of each .lst file to identify the file.
Intel hex files contain address information so any addresses specified in the .load file will be ignored. If you want to load code elsewhere, convert the hex files to binary and the .bin file will be given priority over the .hex file and loaded to the address specified in the .load file.
To load the project, click on 'Load Source' from the File menu, select 'LOAD Files' in the file filter list and navigate to the folder with the file, then click on your .load file and you should see your code.
Assembler directives that define variable space such as .DB, .DW, .DS etc. will be parsed and added to the Variable View. Byte declarations longer than 4 bytes will be shown as arrays or strings.
To load a pure assembler project or load multiple pieces of binary code as a set, you need to write a text file with a .load extension, which is just a list of files and their load adresses in hex, for example...
            boot.lst  0x0
            main.lst  0x1000
In this example, the debugger will stitch together the .lst files into one code view and look for two binary files with the same name but a different extension, which it will load into Z80 memory at the addresses specified.
Suitable binary files are searched for in the following order .bin .out .hex.
Intel hex files contain address information so any addresses specified in the .load file will be ignored. If you want to load code elsewhere, convert the hex files to binary and the .bin files will be given priority over the .hex files and loaded to the addresses specified in the .load file.
After reading a .load file, the debugger sets the PC to the first load addresss in the file. If you want to set the PC somewhere else, you can specify a value (see example below).
.load files can also include binary files which will be loaded to Z80 memory but are not included in the code view. Here is a more complex example...
            main.lst  0x1000
            boot.bin  0x0
            data.hex
            PC        0x1064
In this example, the debugger will show main.lst as the code view and load a matching main.bin/out/hex into Z80 memory at address 0x1000. It will load boot.bin at 0x0 and data.hex at an address specified by the file. After loading, the PC will be set to 0x1064.
If the PC line wasn't in this file, the PC would be set to 0x1000 as that is the first address in the file.
If the .load file only contains .hex files the PC will be set to the first load address in the hex file unless the hex file contains a start address in which case the PC will be set to that.
The last 8 loaded files are shown on the File menu for easy access. The file path is not shown on the menu so it is possible to have two files with the same name but the full path is stored by the debugger and shown on the title bar once loaded.
Binary files are shown on the recent file list as the file name followed by @ load address. The same file with different load addresses appears separately on the recent file list.